Hope you now familiar with JSP basis by going through my previous blog .Now we can study the basics of Servlet
Servlets
Introduction
In the early days, web servers deliver static contents that are indifferent to users' requests. Java servlets are server-side programs (running inside a web server) that handle clients' requests and return a customized or dynamic response for each request. The dynamic response could be based on user's input (e.g., search, online shopping, online transaction) with data retrieved from databases or other applications, or time-sensitive data (such as news and stock prices).Java servlets typically run on the HTTP protocol. HTTP is an asymmetrical request-response protocol. The client sends a request message to the server, and the server returns a response message as illustrated.

Environment setup
Step 1) Create Servlet project
Create the dynamic web project:
For creating a dynamic web project click on File Menu -> New -> Project..-> Web -> dynamic web project -> write your project name e.g. first -> Finish.
|


Create the servlet in eclipse IDE:
For creating a servlet, explore the
project by clicking the + icon -> explore the Java Resources -> right
click on src -> New -> servlet -> write your servlet name e.g. Hello
-> uncheck all the checkboxes except doGet() -> next -> Finish.
|


Add jar file in eclipse IDE:
For adding a jar file, right click on
your project -> Build Path -> Configure Build Path -> click on
Libraries tab in Java Build Path -> click on Add External JARs button
-> select the servlet-api.jar file under tomcat/lib -> ok.
|


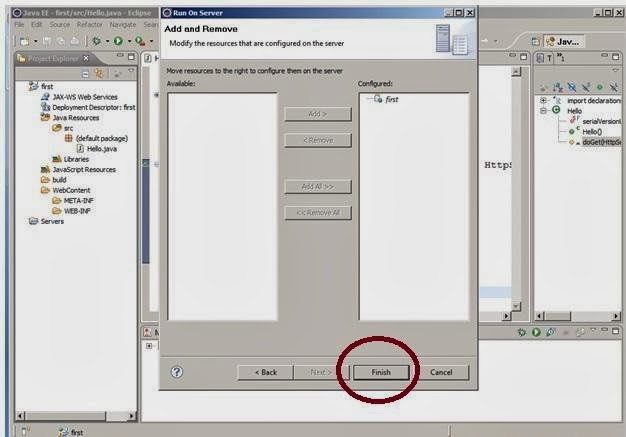
4) Start the server and deploy the project:
For starting the server and deploying the project in one step, Right click on your project -> Run As -> Run on Server -> choose tomcat server -> next ->addAll -> finish.


It is easy to manage the server
instance. Right-click on the server and start and stop it to ensure its proper
working.


For test Tomcat is up and running , After
starting the Tomcat, open browser and type http://localhost:8080. You
should see the Apache Tomcat home page as shown below.
And here you go , Stop the server , if its already started
and go to the above servlet project, right click Run As à Run
On Server .. Your servlet soup is ready to serve .. J
No comments:
Post a Comment