Servlet –Tomcat configurations
Before we start, About me , I am a lazy reader and if I get a document, what I usually do is to scroll it in search of an Image and focus on it, rather than reading it .This documents are mainly targetting that type of audience :)
Step 1) Assume you already setup Java/JDK 7 and Eclipse
Step 2) Running servlet First we need to install Tomcat server 7.0
Execute the installer exe file and go through it like this:


Choose “Normal” type to install.

Configure your Tomcat with this adjustment.


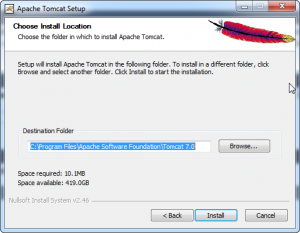
Choose install location & click install.
When Tomcat installation completed open your eclipse IDE. Then open “Window” -> “Preferences” a new dialog will open.
 Choose your tomcat version (v.7.0) and click “Next”.

Then maintain a name and the tomcat installation directory
 That’s it.

Click Next
You have to agree the license agreement.
Choose “Normal” type to install.
In this dialog you should navigate to Runtime Environments.
Click “Add…”
We have to take into account that Tomcat depends on java so it will look for the system variable JAVA_HOME which will indicate where is the java installation. Example: JAVA_HOME=" C:\Program Files\Java\jdk1.6.0_21"
Once the server is started we can see if it works with any Browser writing http://localhost:8080 and we should something like:
http://localhost:8080 Pointing to \{tomcat installation dir} \WebApps.
Inside the folder webapps\ we create a folder first-servlet\ which will be the name of our web aplication and inside it we create a file named welcome.html with the following content:
<html>
<head>
<title>Coders global</title>
</head>
<body>
<h1>Study servlet</h1>
<p>Hip, hip ,hurreyyyyyy<br/>got in tomcat Web.</p>
</body>
</html>
|
We go back to the Browser and point to http://localhost:8080/first-servlet/welcome.html and we should obtain our First Page:
========================================================================
Sujeesh
No comments:
Post a Comment